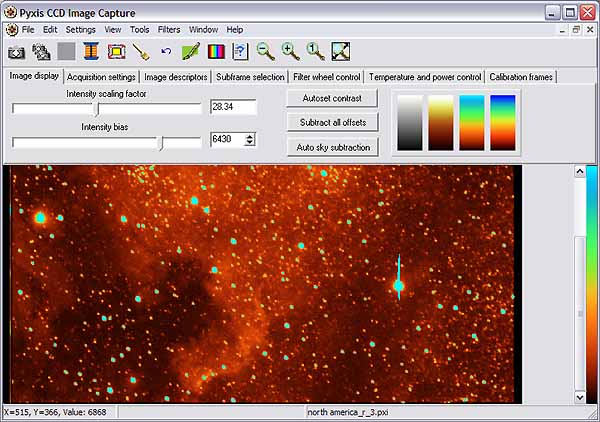
The main Pyxis program window is shown below. The window may be divided into a few principal parts. On the top of the form there is the main menu bar; most image processing commands and other general program functions are found in the menu bar. Below this we have a tool bar containing several icons; clicking on these icons perform certain frequently used operations in the program, for example, zooming in and out of an image. Below the tool bar is a series of tabbed forms that contain settings for displaying and capturing the images. These are frequently accessed controls that would normally be kept easily accessible on the main form, however, the tabbed forms can also be hidden by de-selecting "View->Main Acquisiting controls".
The main client area of the window is used to display the captured
or loaded images. Images are displayed in separate child
windows. Clicking on a
child window has the effect of bringing that image window into focus.
Settings on the main form always reflect the settings for the currently
focussed child window. The user can select the maximum number of
child windows that can be open on the form by changing the setting
under "Window->Maximum files open". The user also has the
option of forcing any newly captured images to be loaded in the same
child window; this saves time due to the overhead of opening and
closing child windows.
The palette for the currently focussed image, or the default palette
if no image is loaded, is displayed on the right edge of the client
area. When an image has focus, a cross-hair cursor appears and
the pixel position and "intensity" value of the pixel is displayed on
the left hand side of the status bar (at the bottom of the form).
The file name of the image is displayed to the right of the pixel
coordinates. Pressing the left mouse button down on the image and
dragging the mouse causes a selection rectangle to be drawn on the
image. This is used for selecting image subframes for various
operations. The subframe can also be manually selected on the
"Subframe selection" tab-control page. Double clicking on the
image and holding the left mouse button down while moving the mouse
causes a "rubber band" or selection-line to be drawn on the
image. The selection line is used to select a cross-section to
display through the image. Once a selection has been made on the,
right clicking on the image brings up a pop-up with various action
options; for example, one option is to display the selected
cross-section through the image. Of particular importance is the
"Set capture coordinates" option, which is used to apply the selected
sub-frame to the image capture sub-frame (useful for focussing or rapid
capture of planetary image sequences).
Saving the program settings
Note that when you close Pyxis, many of the settings you used in
displaying the last image viewed are saved and automatically and will
be applied next time Pyxis runs. The position and size of the
main form in the screen area is also maintained between sessions.
To save the current settings and make them the default settings, select
"File->Save settings as default" - this is to allow the settings to
be saved in case the application hangs before it is terminated
normally. The settings can also be saved in a completely
different file so that different capture setups can be recalled easily.